23 Stunning Spring Nail Designs for Dark Skin Tones
Spring is here, and it’s time to refresh your nail game!
Finding the perfect nail designs that pop against dark skin tones can elevate your style tenfold.
With these spring nail ideas, tailored specifically for darker complexions, you’ll discover bold colors, soft pastels, and chic patterns for every vibe.
Keep scrolling to find your new favorite look!

Best 23 Spring Nails for black woman 2025
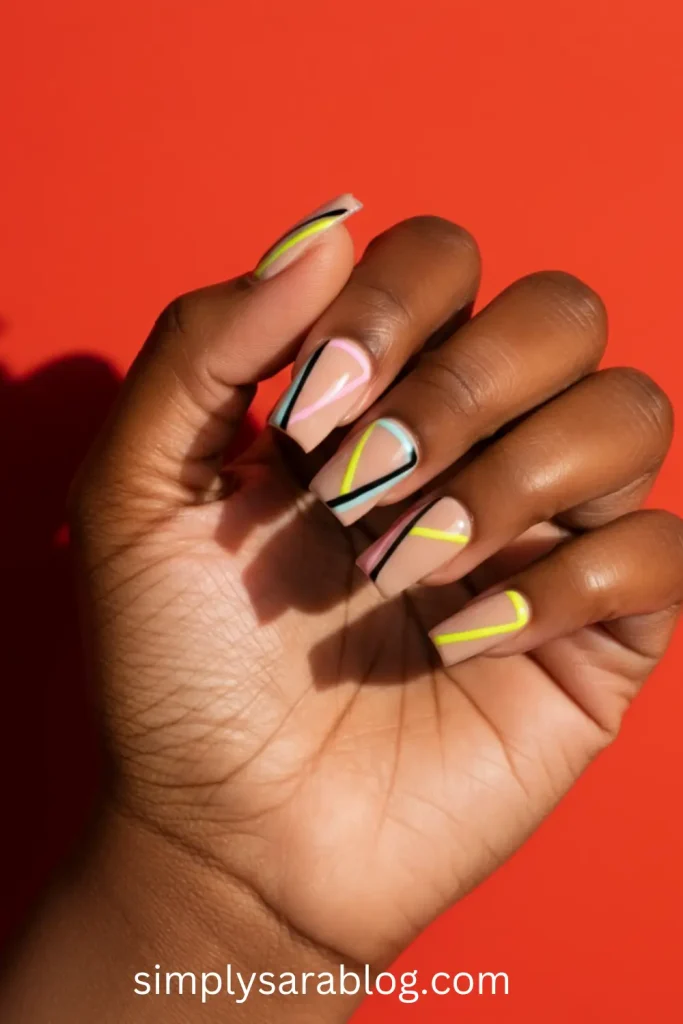
1. Geometric Nail Art
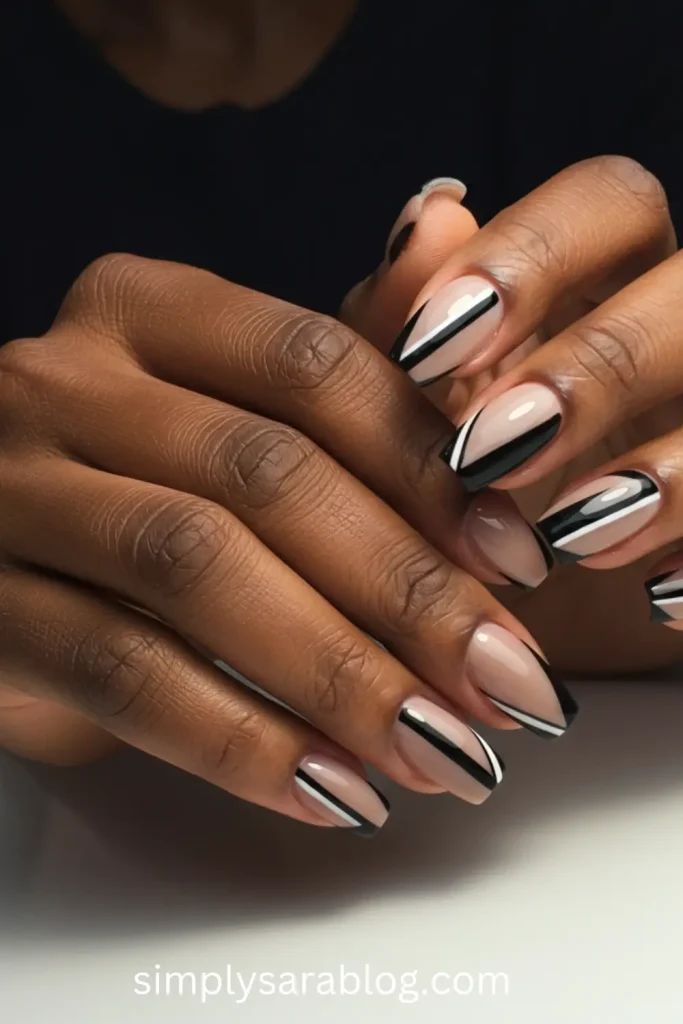
Overview
Geometric nail art blends bold lines, contrasting shapes, and vibrant shades to create a standout, artsy manicure. This modern design pops perfectly on dark skin tones, making it a stylish and versatile choice for the spring season.
Step-by-Step Instructions
- Paint nails with a neutral base coat (like nude or white).
- Use striping tape to create clean lines and shapes (triangles, squares, etc.).
- Fill the shapes with bright or metallic polish.
- Remove the tape carefully and apply a glossy topcoat.
Necessary Tools
- Base coat
- Neutral nail polish
- Bright or metallic polishes
- Nail striping tape
- Topcoat
Ideal For: Creative events, artful outfits, or when you want a modern, edgy aesthetic.
2. Velvet Matte Nails
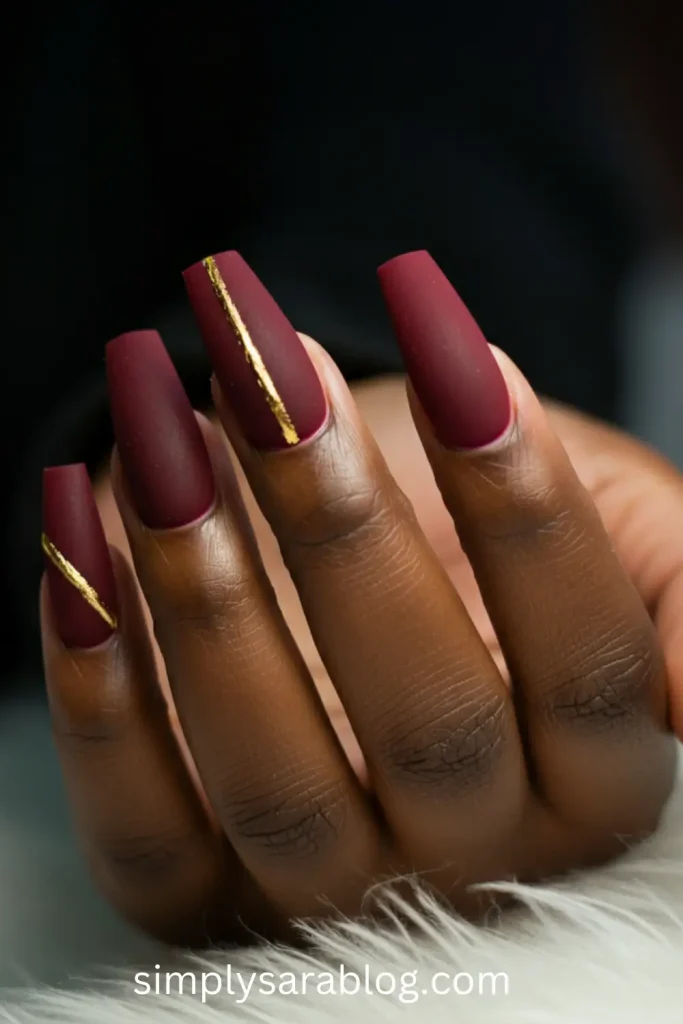
Overview
Sophisticated and chic, velvet matte nails are a minimalist’s dream. This soft texture adds a velvety elegance to dark skin tones, especially when paired with deep jewel shades like burgundy, emerald, or navy.
Step-by-Step Instructions
- Prep nails and apply a matte base coat.
- Paint nails with a deep matte shade of your choice.
- Allow it to dry completely, ensuring the velvety finish stays intact.
- Add no topcoat for a fully matte look.
Necessary Tools
- Matte base coat
- Matte nail polish in jewel tones (burgundy, emerald, navy)
Ideal For: Business meetings, formal events, or when you’re channeling elegance with simplicity.
3. Swirled Nail Design
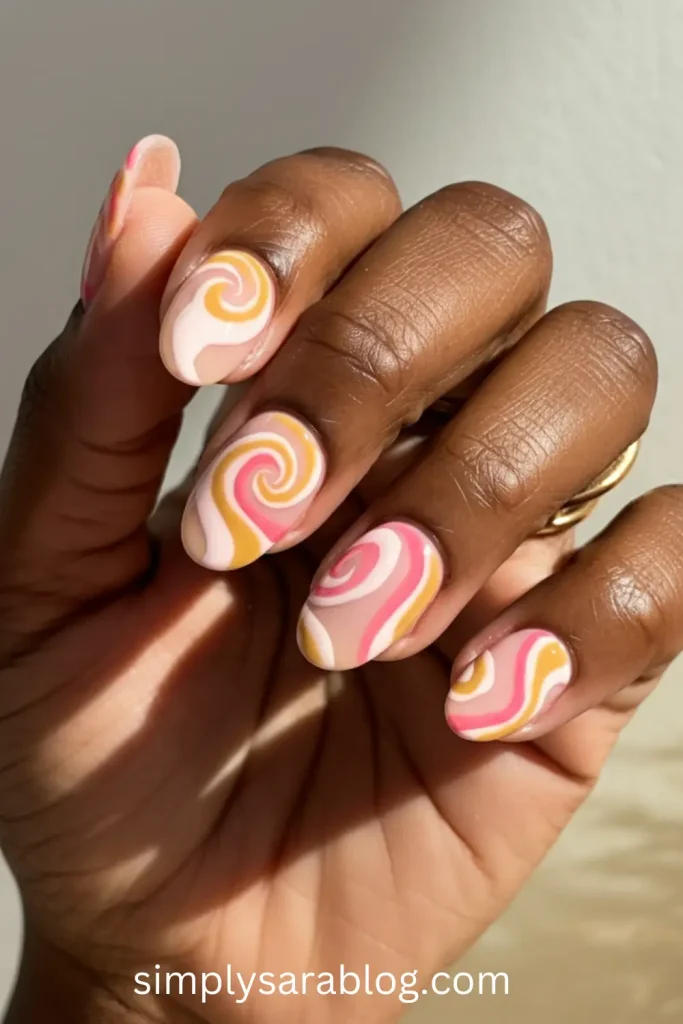
Overview
Swirled nails are artistic and hypnotic, featuring soft twisting patterns in pastel or vibrant hues. This abstract design is playful and perfectly suited for the carefree vibe of spring.
Step-by-Step Instructions
- Apply a nude or clear base coat.
- Using a thin nail art brush, create swirls in at least two colors (try pastel pink and blue).
- Overlap the colors for a fluid effect.
- Finish with a clear coat to seal the design.
Necessary Tools
- Nude base coat
- Nail art brushes
- Colored polishes (pastels or vibrant shades)
- Topcoat
Ideal For: Creative gatherings, spring picnics, or when you’re feeling whimsical.
4. Neon-Accented Nails
Overview
Bring some electrifying energy to your nails with neon accents. Bright green, orange, or pink neon details create a fun and bold aesthetic that contrasts beautifully with dark skin tones.
Step-by-Step Instructions
- Apply a white or nude base coat.
- Use striping tape or a detail brush to add stripes, dots, or neon tips in your chosen neon shade.
- Layer a topcoat to secure the design.
Necessary Tools
- Base coat
- Neon polishes (green, orange, pink)
- Striping tape or dotting tools
- Topcoat
Ideal For: Concerts, nights out, or spring festivals with high-energy flair.
Read More: 25 Short Spring Nail Ideas Perfect for 2025
5. Translucent Tortoiseshell Nails
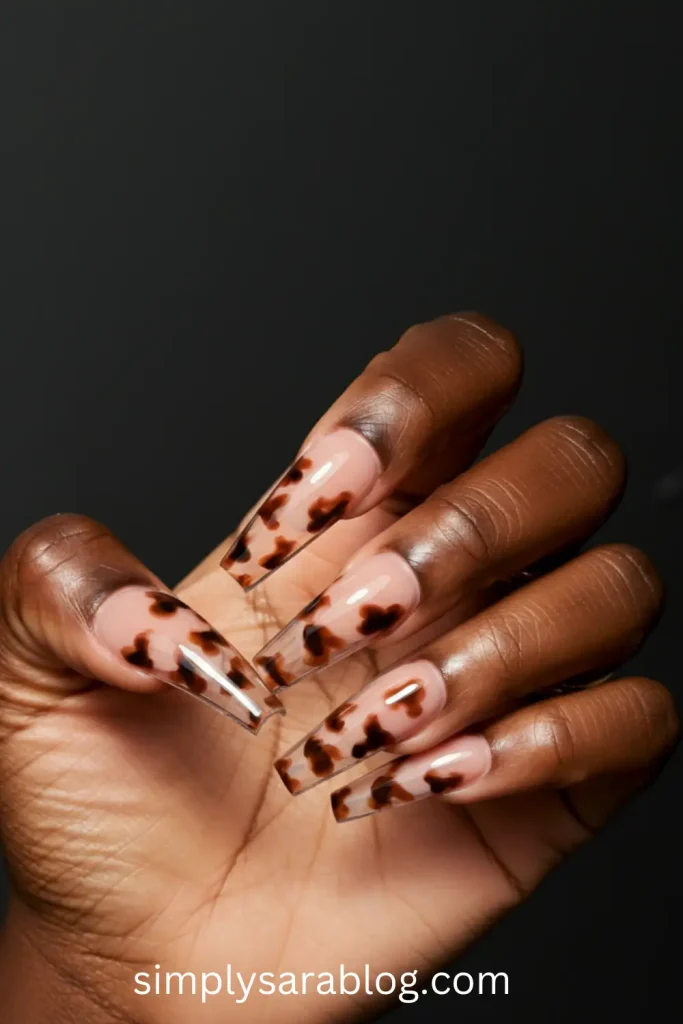
Overview
Translucent tortoiseshell nails mimic the classic pattern of tortoiseshell accessories, blending caramel tones with black swirls. It’s a chic, understated design that radiates timeless sophistication on dark skin tones.
Step-by-Step Instructions
- Apply a sheer caramel-colored base coat.
- Use black polish and a small brush to create irregular spots.
- Dab on darker brown polish for depth, blending with a sponge.
- Finish with a glossy topcoat.
Necessary Tools
- Sheer caramel polish
- Black and dark brown polishes
- Sponge
- Clear topcoat
Ideal For: Office settings, brunches, or when you want a trend-forward manicure.
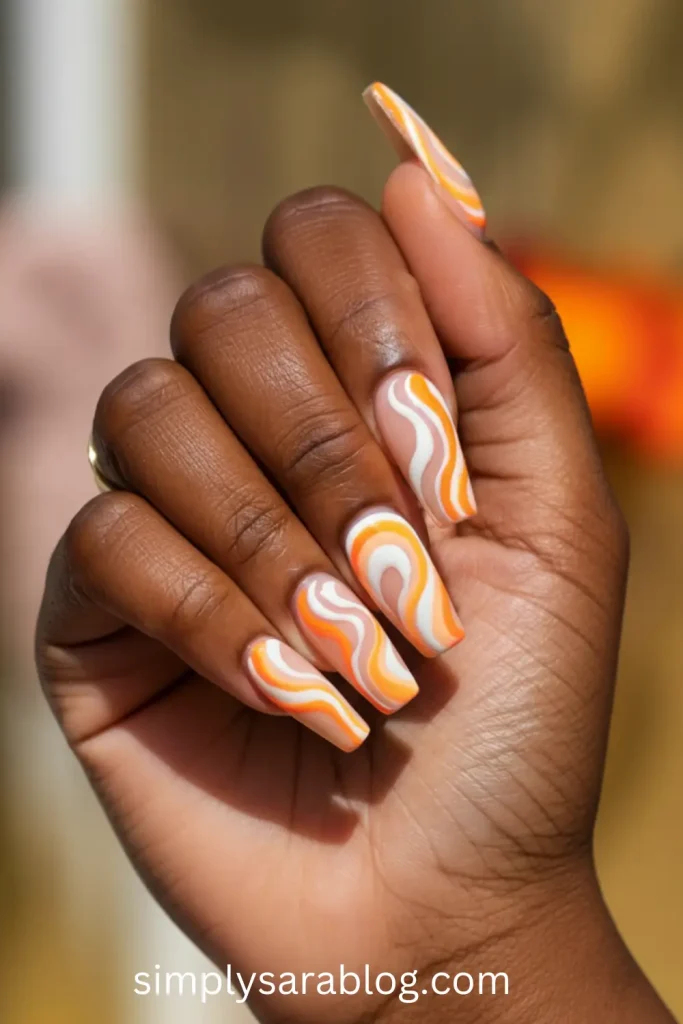
6. Sunset Swirl Nails
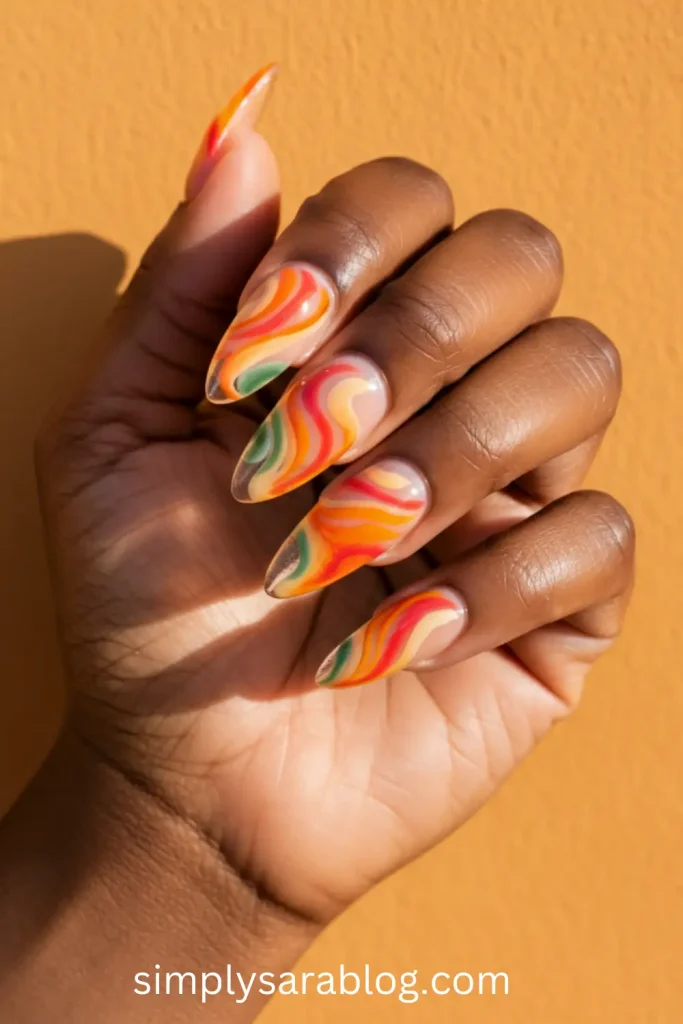
Overview
Capture the magic of a vibrant sunset in this swirly nail design. Using shades of orange, pink, and yellow, this dreamy nail art mimics nature’s most breathtaking moment.
Step-by-Step Instructions
- Apply a white base coat.
- Using a detail brush, paint swirling orange, pink, and yellow patterns.
- Blend for a gradient-like effect.
- Seal with a topcoat.
Necessary Tools
- White base coat
- Orange, pink, and yellow polish
- Detail brush
- Topcoat
Ideal For: Sunset beach dates, tropical outfits, or when you’re chasing golden hour vibes.
7. Neon Pink Nails
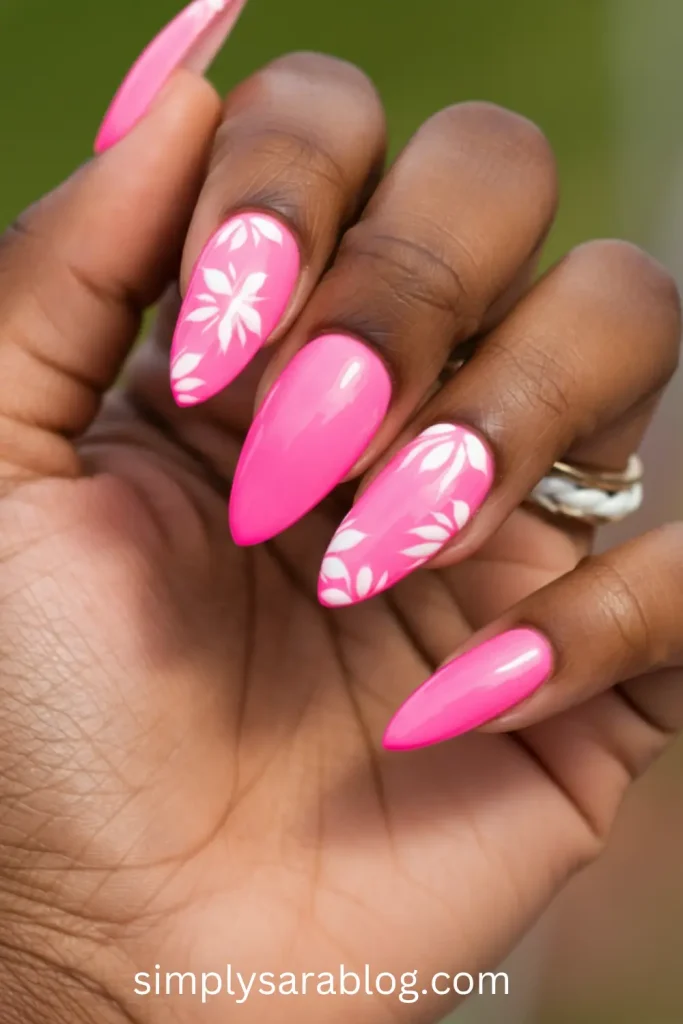
Overview
Nothing says confidence like neon pink nails! This bold color radiates fun and positivity, instantly making any outfit pop. It’s a lively choice that highlights the beauty of darker skin tones.
Step-by-Step Instructions
- Shape and buffer nails, applying a clear base coat.
- Paint nails with two coats of neon pink polish.
- Add a glossy topcoat for extra shine and durability.
Necessary Tools
- Base coat
- Neon pink nail polish
- Glossy topcoat
Ideal For: Girls’ nights, springtime parties, or when you’re in the mood to stand out.
8. Emerald-Edged Nails
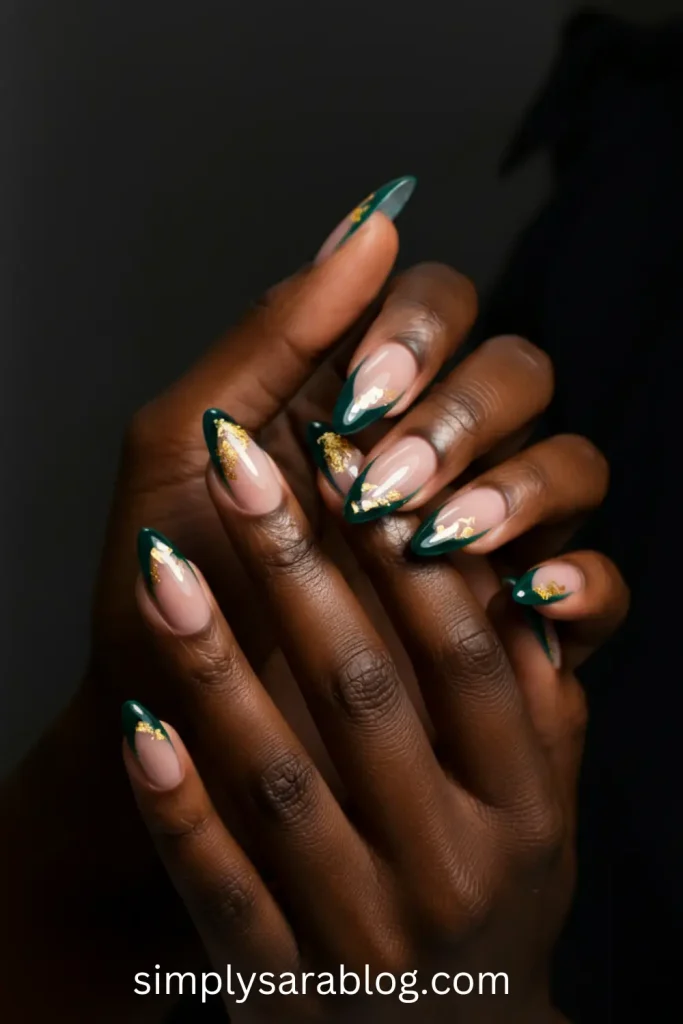
Overview
Add a regal twist with emerald-edged nails. This subtle design features elegant green accents framing each nail, giving a luxurious yet low-key effect.
Step-by-Step Instructions
- Paint nails with a sheer nude or clear base coat.
- Use a thin brush to line the edges of each nail with emerald green polish.
- Finish with a glossy topcoat for a sleek look.
Necessary Tools
- Sheer nude polish
- Emerald green polish
- Nail art brush
- Topcoat
Ideal For: Formal dinners, work events, or anytime you want a hint of royalty.
9. Classic Elegance with a Deep Plum Twist
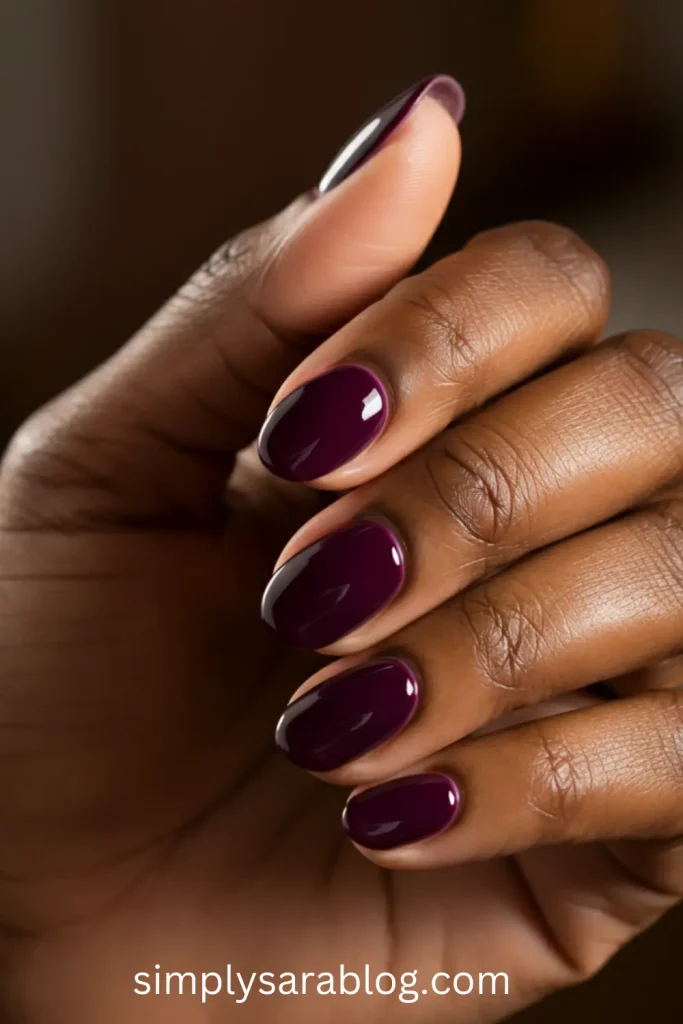
Overview
Deep plum nails exude sophistication and drama while adding a rich contrast to dark skin tones. Combined with a subtle shimmer or glossy finish, this design is timeless and perfect for any occasion.
Step-by-Step Instructions
- Prep nails by filing and shaping them to your desired length.
- Apply a base coat to protect your nails.
- Paint all nails with two coats of deep plum nail polish.
- Add a layer of fine shimmer polish on top for a luxurious finish.
- Complete with a glossy topcoat.
Necessary Tools
- Nail file and buffer
- Base coat
- Deep plum nail polish
- Shimmer polish
- Topcoat
Ideal For: Chic evening events, date nights, or when you want a touch of understated glam.
Read More: 59 Gorgeous Spring Nail Art Designs for a Fresh Look
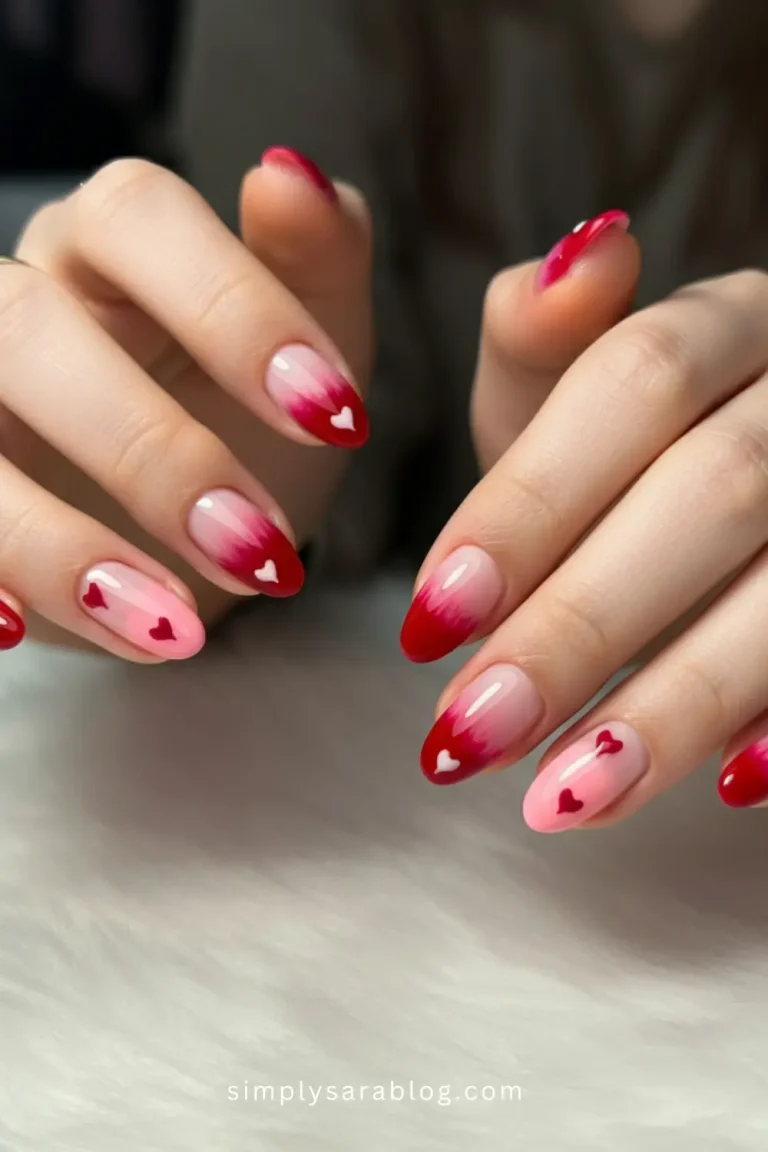
10. The Bold and the Beautiful in Red
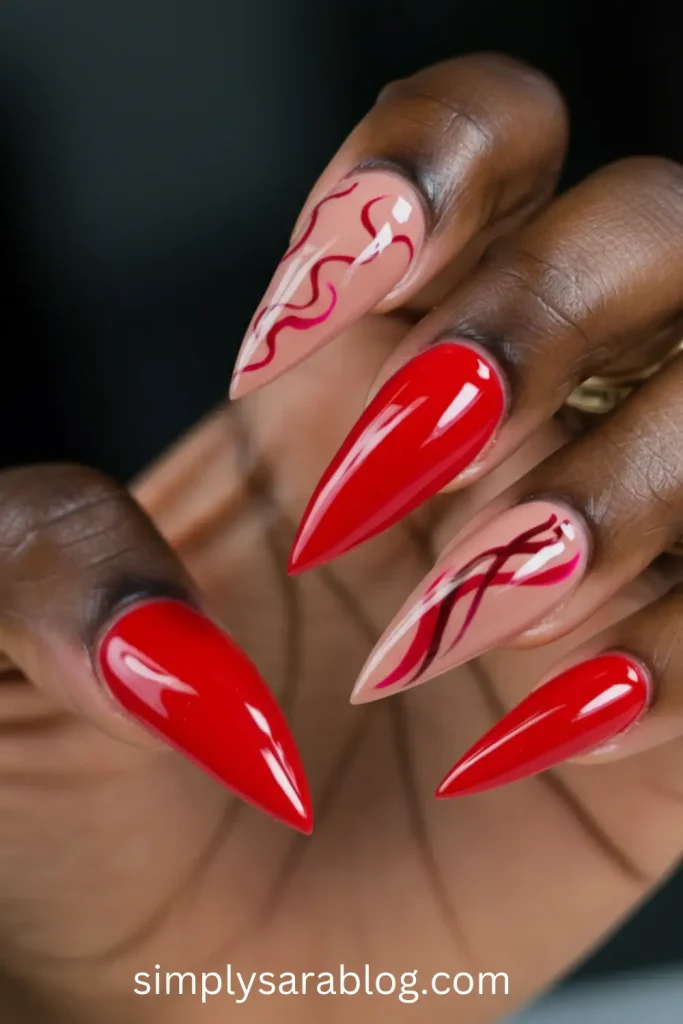
Overview
Red nails are a classic, but this spring it’s all about fiery and bold reds that bring energy and confidence. The vibrant shade enhances dark skin tones, creating a striking and fearless look.
Step-by-Step Instructions
- Trim and shape your nails into a neat oval or almond shape.
- Apply a nourishing base coat.
- Paint nails with two coats of your favorite fiery red polish.
- Add a glossy topcoat for that high-shine effect.
Necessary Tools
- Nail file and shaping tool
- Base coat
- Fiery red nail polish
- Glossy topcoat
Ideal For: Power meetings, parties, or a bold pick-me-up mood.
11. Whimsical Waves in Pastel
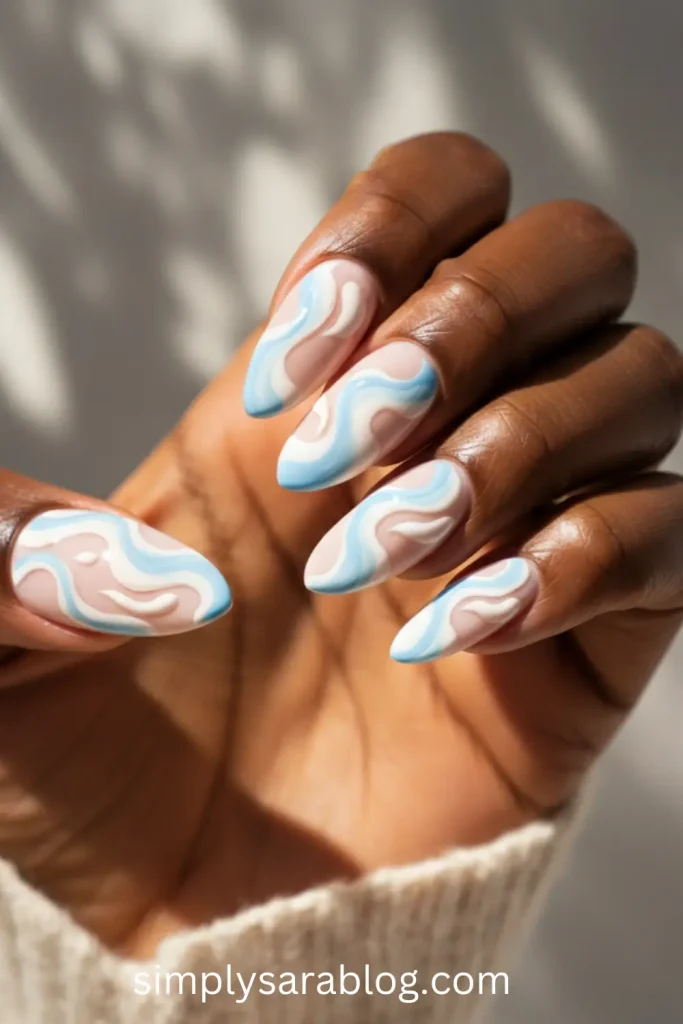
Overview
Bring a soft, whimsical vibe to your nails with pastel waves. Blending light lavender, baby blue, and lemon yellow creates a playful, dreamy design perfect for the season.
Step-by-Step Instructions
- Paint all nails with a neutral nude base coat.
- Using a thin brush, paint gentle pastel waves in lavender, blue, and yellow.
- Seal the design with a clear topcoat to smooth the layers.
Necessary Tools
- Nail art brushes
- Neutral nude base coat
- Pastel lavender, baby blue, and lemon yellow polish
- Clear topcoat
Ideal For: Brunches, casual days out, or playful spring vibes.
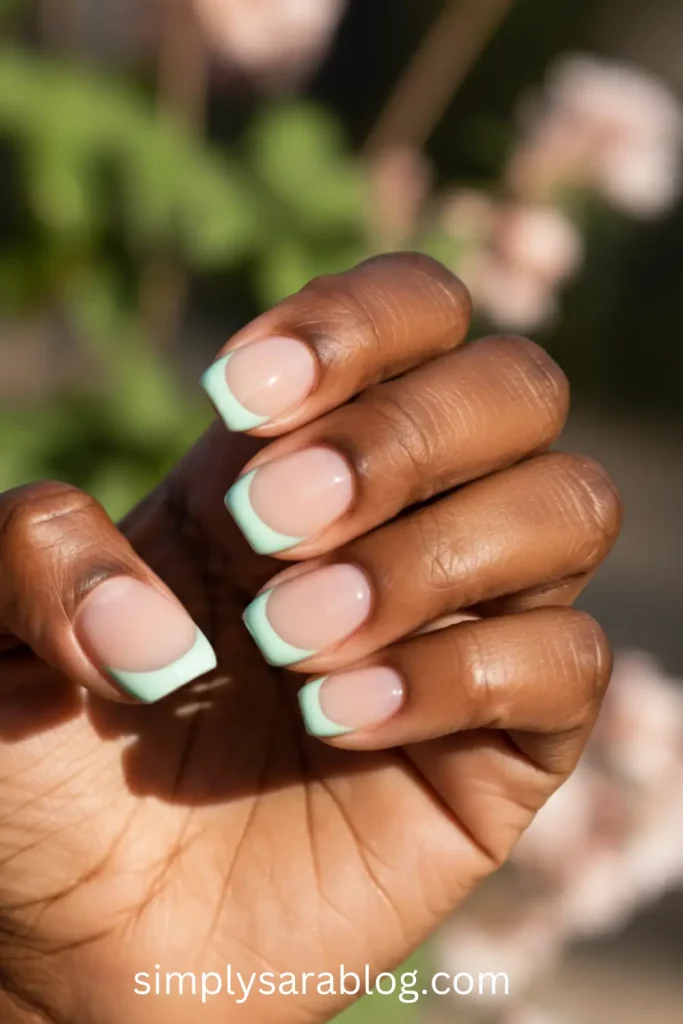
12. French Manicure with a Twist of Mint
Overview
Take the classic French manicure and reimagine it with a fresh mint tip. The cool pastel green adds a refreshing, modern touch that pairs beautifully with dark skin tones.
Step-by-Step Instructions
- Shape nails into a classic square tip.
- Using a nude polish, create a base coat.
- Paint mint green polish on the tips of each nail, ensuring clean lines.
- Finish with a shiny topcoat.
Necessary Tools
- Nail file and shaping tool
- Nude polish
- Mint green nail polish
- Topcoat
Ideal For: Spring weddings, garden parties, or when you want a modern, classy vibe.
13. Sunset Hues for the Stylish
Overview
Capture the beauty of a spring sunset on your nails. Blend orange, pink, and purple ombré shades to create this dreamy gradient look.
Step-by-Step Instructions
- Buff and shape your nails to your desired length.
- Sponge on orange, pink, and purple polish to create a gradient effect.
- Clean up the edges with a small brush and remover.
- Seal with a topcoat.
Necessary Tools
- Nail sponges
- Bright orange, pink, and purple nail polishes
- Small brush
- Topcoat
Ideal For: Beach vacations, evening events, or vibrant spring outfits.
14. Swirls of Creamsicle Dreams
Overview
Dreamy swirls of creamsicle orange and white create a fun and fresh design that screams springtime fun.
Step-by-Step Instructions
- Paint all nails with a white base coat.
- Using a thin brush, create swirls of orange polish over each nail.
- Add some overlap for a more dynamic pattern.
- Finish with a glossy topcoat.
Necessary Tools
- White base coat polish
- Creamsicle orange polish
- Nail art brush
- Topcoat
Ideal For: Casual weekends, festivals, or refreshing spring style.
Read More: 22 Stunning White Spring Nail Ideas You’ll Adore
15. Groovy Green and Yellow Vibes
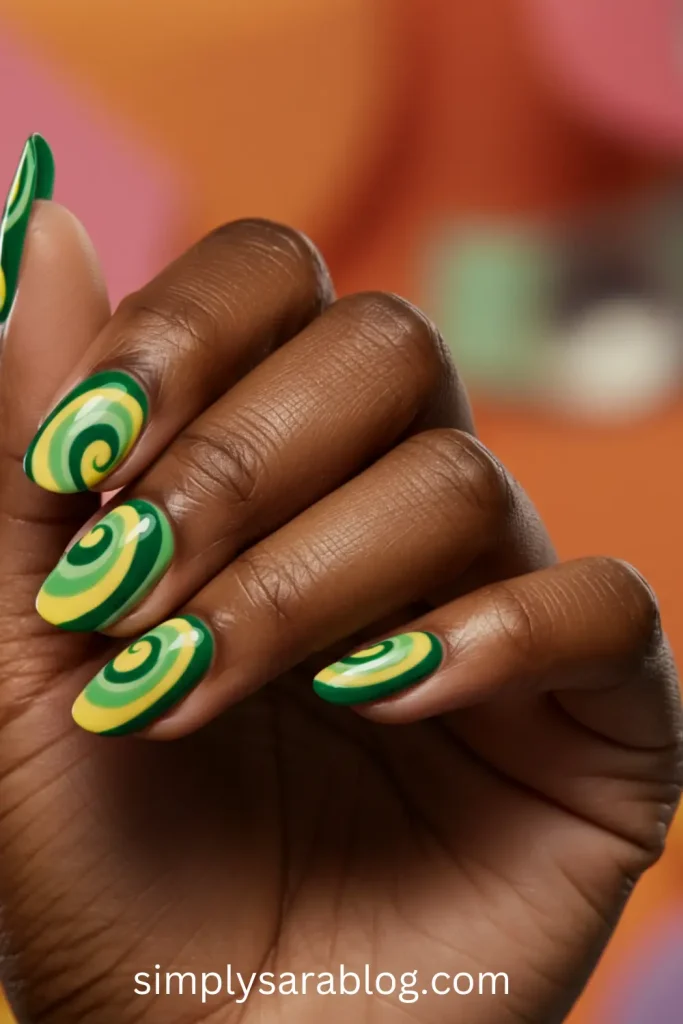
Overview
Say hello to retro vibes with this groovy green and yellow design! Swirls and playful patterns in vibrant shades capture spring’s energy, perfectly complementing dark tones with bold, cheerful hues.
Step-by-Step Instructions
- Start with a clear or nude base coat.
- Use a thin nail art brush to paint alternating green and yellow swirl patterns.
- Add dots or small shapes for extra flair.
- Seal with a glossy topcoat to lock in the design.
Necessary Tools
- Nail art brushes
- Green and yellow nail polishes
- Base coat
- Topcoat
Ideal For: Music festivals, retro-themed outfits, or when you want a splash of 70s-inspired fun.
16. Luminous Marble Magic
Overview
Achieve a chic and luxurious look with luminous marble nails. Featuring silver, white, and a touch of metallic gold, this design is all about elegance and a touch of opulence.
Step-by-Step Instructions
- Start with a white base coat on all nails.
- Use a fine brush to paint gray marble-like veins across the surface.
- Add thin streaks of metallic gold for an elevated touch.
- Finish with a clear topcoat for a glossy result.
Necessary Tools
- White and gray nail polish
- Metallic gold nail polish
- Nail art brush
- Clear topcoat
Ideal For: Formal occasions, elegant evenings, or when you want a polished, high-end look.
17. Geometric Jungle

Overview
Bold and artsy, the geometric jungle design pairs deep greens and sharp white patterns for a modern yet earthy vibe. It’s a statement look that perfectly complements melanin-rich tones.
Step-by-Step Instructions
- Apply a deep forest green base coat.
- Use a striping tool to create clean, sharp white geometric lines and shapes on each nail.
- Alternate with gold triangles or dots for added depth.
- Top it off with a clear coat to preserve the design.
Necessary Tools
- Forest green nail polish
- White nail polish
- Striping tool
- Clear topcoat
Ideal For: Nature lovers, creative events, or a unique spring statement.
18. The Classic Pearlescent Sophistication
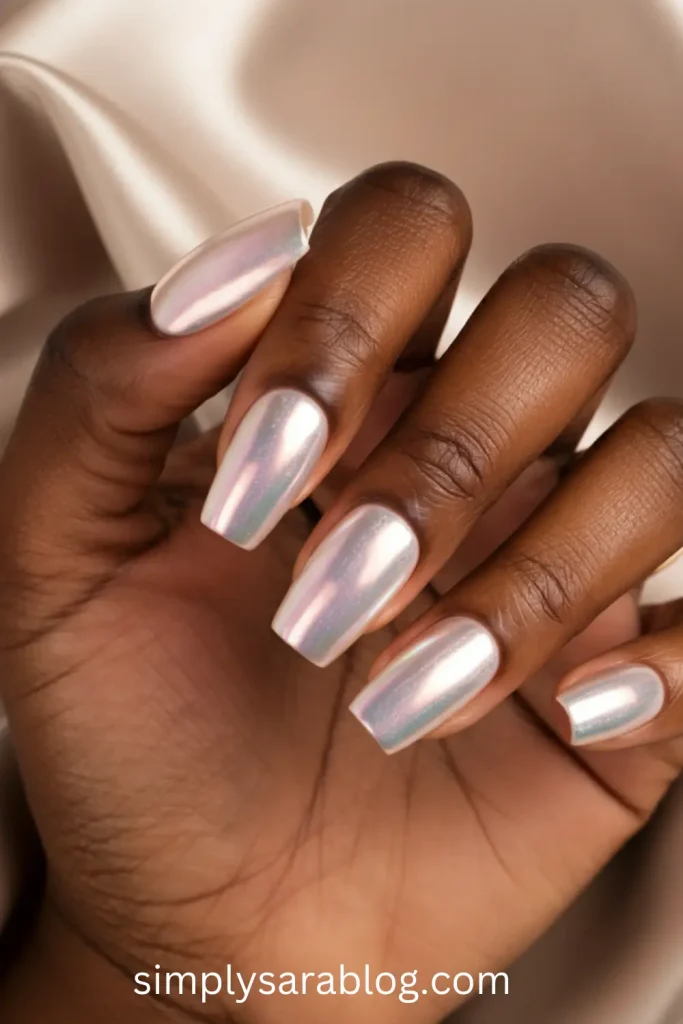
Overview
Elevate any look with pearlescent nails. The subtle shimmer of this classic design enhances the natural glow of darker skin tones, making it a beautiful and versatile choice.
Step-by-Step Instructions
- File your nails to your preferred shape and buff the surface.
- Apply a sheer pearlescent polish in two thin coats.
- Add a touch of shimmer with a silver or gold accent stripe.
- Seal the look with a glossy topcoat.
Necessary Tools
- Nail file and buffer
- Pearlescent polish
- Shimmer polish for accents
- Glossy topcoat
Ideal For: Weddings, formal events, or when you want a timelessly elegant touch.
19. Emerald Allure
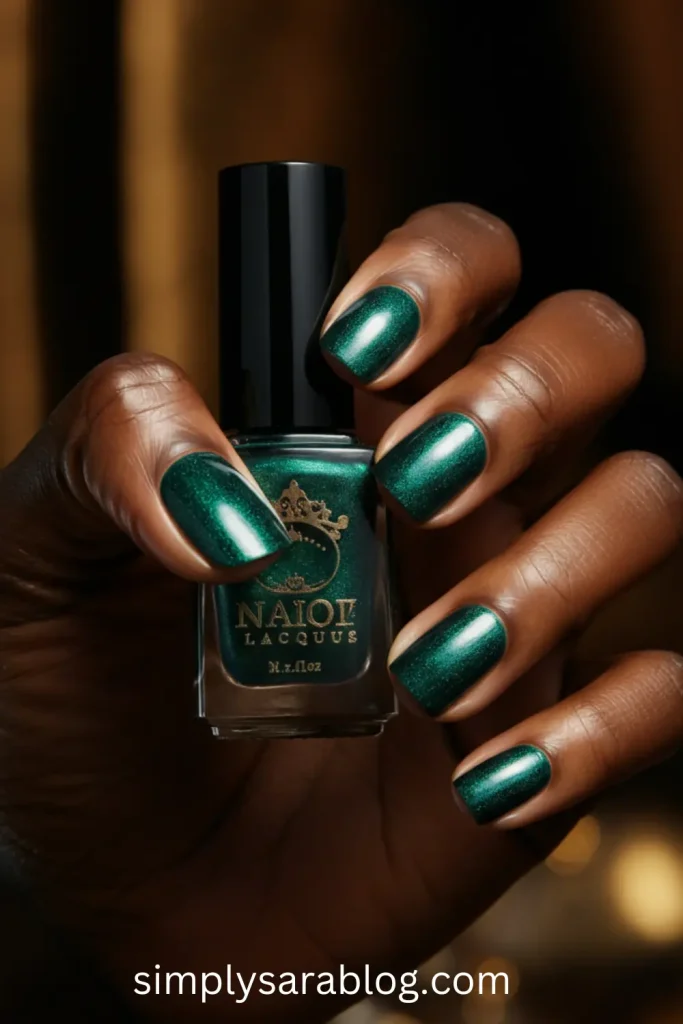
Overview
Rich and vibrant, emerald nails bring a sense of royal elegance. Accented with a touch of gold or glitter, this design is glamorous yet easy to wear for spring.
Step-by-Step Instructions
- Apply a base coat to prep nails.
- Paint all nails with two coats of emerald green polish.
- Add gold foil or glitter to the edges for a luxe finish.
- Protect the look with a durable topcoat.
Necessary Tools
- Base coat
- Emerald green polish
- Gold foil or loose glitter
- Topcoat
Ideal For: Glam nights out, fancy dinners, or when you need a touch of luxury.
Read More: Top 23 Green Spring Nail Ideas to Freshen Up Your Look
20. Fuchsia French Twist
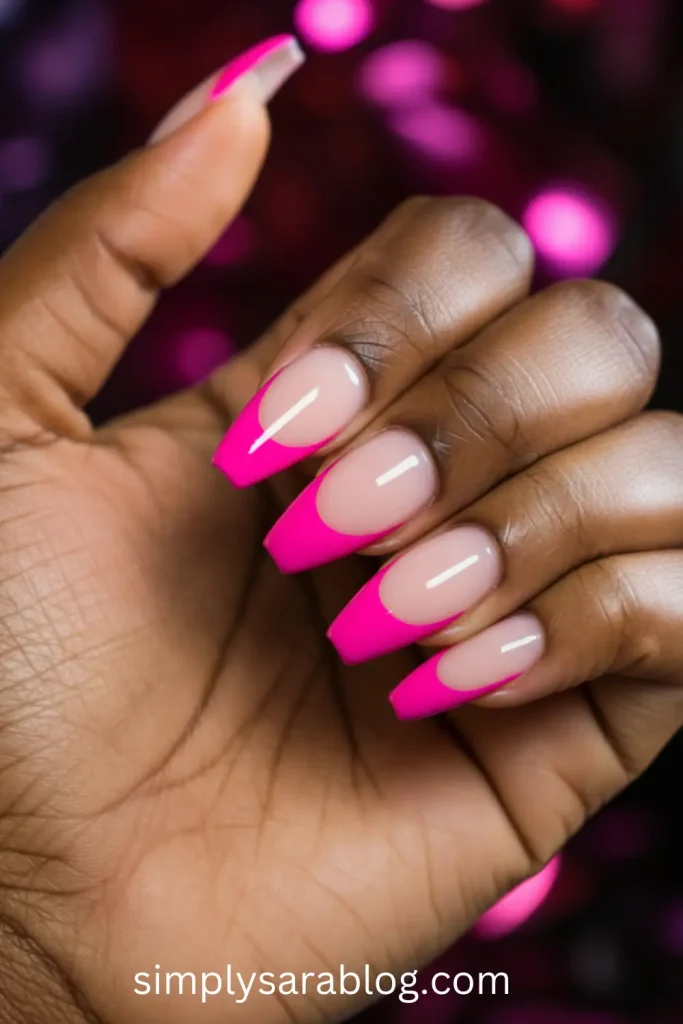
Overview
Upgrade the classic French manicure with a bold fuchsia twist! This vibrant pink adds energy to the timeless style, making it a fresh and flirty spring option.
Step-by-Step Instructions
- Shape nails with a square or oval tip.
- Apply a sheer nude or light pink base coat.
- Use fuchsia polish to create crisp French tips.
- Seal the design with a shiny topcoat.
Necessary Tools
- Nude or light pink base polish
- Fuchsia pink polish
- Nail guide strips (optional)
- Topcoat
Ideal For: Spring brunches, playful outfits, or when you’re feeling vibrant and trendy.
21. Peachy Keen
Overview
This soft and sweet peach-toned nail design is all about effortless beauty. It’s simple, fresh, and pairs perfectly with the lively vibe of spring.
Step-by-Step Instructions
- Prep nails with filing and a base coat.
- Paint nails with two coats of peach-colored polish.
- Add white floral nail decals or stamps for a delicate design (optional).
- Finish with a glossy topcoat.
Necessary Tools
- Base coat
- Peach nail polish
- Floral nail decals or stamps
- Topcoat
Ideal For: Casual outings, garden parties, or pastel spring outfits.
22. Leopard Print Prowess
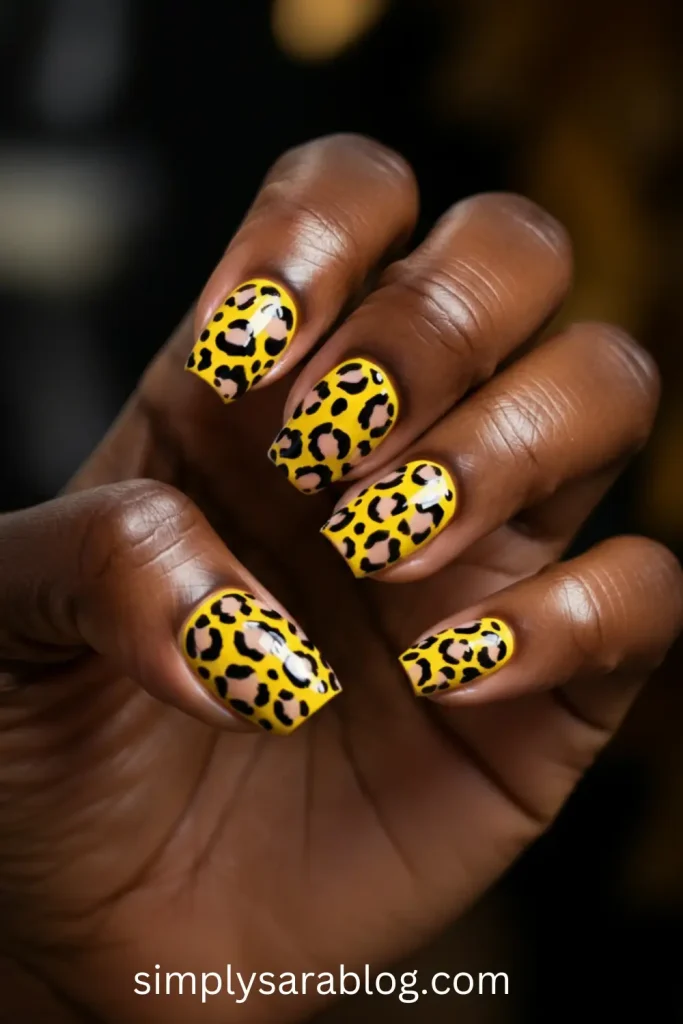
Overview
Unleash your wild side with the timeless leopard print. Golden brown and black patterns pop effortlessly against dark skin tones for a playful, daring look.
Step-by-Step Instructions
- Apply a golden beige base coat.
- Use a thin brush or dotting tool to create irregular black spots, filling each with brown.
- Add fine metallic outlines to some spots for extra style.
- Finish with a topcoat.
Necessary Tools
- Golden beige nail polish
- Brown and black nail polishes
- Dotting tool or fine brush
- Topcoat
Ideal For: Night outs, bold fashion statements, or when you’re feeling fierce.
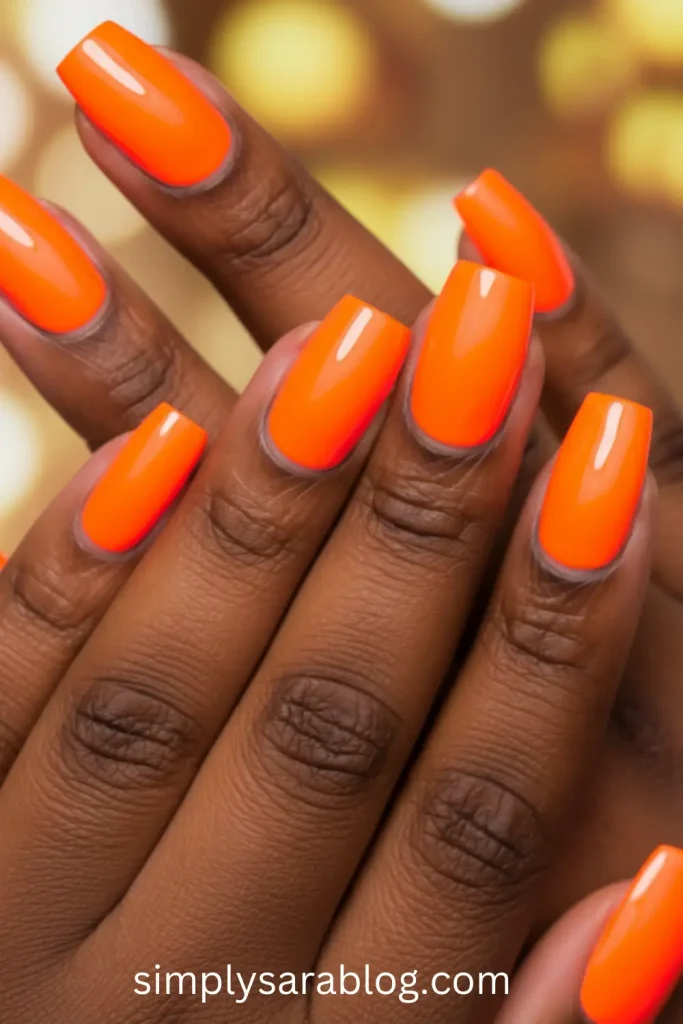
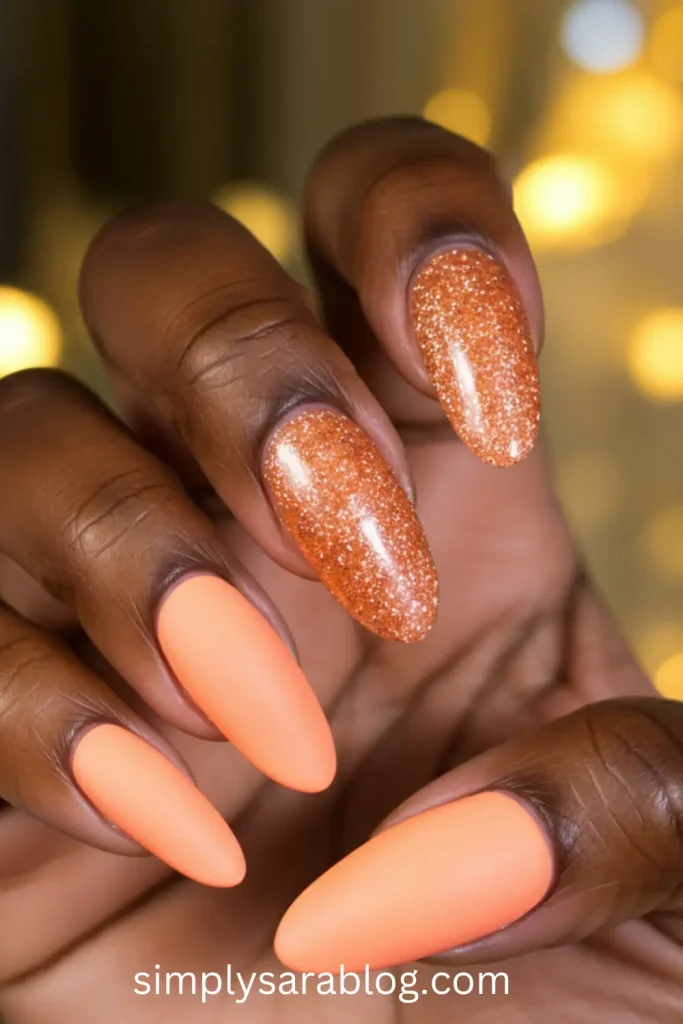
23. Tangerine Dream

Overview
Bright, bold, and full of life, tangerine nails scream spring energy! This juicy color enhances dark skin wonderfully and instantly puts you in a cheerful mood.
Step-by-Step Instructions
- Shape and clean nails, then apply a base coat.
- Paint all nails with rich tangerine orange polish in two layers.
- Add small white or gold dots for a cute, playful finish (optional).
- Top with a glossy coat to add shine.
Necessary Tools
- Base coat
- Tangerine orange nail polish
- White or gold nail polish (optional)
- Topcoat
Ideal For: Tropical vacations, fun outdoor events, or simply chasing sunny vibes.
Choosing the Perfect Nail Design for Dark Skin
When selecting the best nail design for dark skin, consider these tips to highlight your natural beauty and personal style:
- Color Contrast: Opt for vibrant shades to contrast beautifully with your skin tone, such as neon, pastel, or jewel tones.
- Skin Undertones: Match nail colors to your skin’s cool, warm, or neutral undertones for a harmonious look.
- Occasion Styling: Choose designs that suit the occasion—glamorous for evening events, playful for casual outings.
- Accessorizing: Coordinate nail designs with your jewelry or outfit for a polished, cohesive appearance.
- Experimentation: Don’t shy away from bold textures or patterns; they create statement-worthy nails!
FAQ
What nail colors look best on dark skin tones during spring?
Bright neon shades, soft pastels, and deep jewel tones like emerald green or plum complement dark skin tones beautifully in spring.
Can I mix multiple nail designs in one manicure?
Absolutely! Try mix-and-match trends like pastel swirls, neon tips, or accent nails with geometric patterns for a versatile spring vibe.
How can I make my nail designs last longer?
Always apply a base and topcoat, avoid harsh chemicals, and moisturize your hands regularly to prolong your manicure’s durability.
Are matte nails a good option for darker skin tones?
Yes, matte nail designs in bold or jewel tones look stunning on darker skin, adding a smooth, velvety finish that’s chic and sophisticated.
What tools do I need to try these nail designs at home?
Basic tools like nail files, brushes, sponges, striping tape, and nail polishes in your preferred colors are a great start for DIY nail art.
What’s Your Favorite?
Which design speaks to your style? Are you drawn to the bold neon accents, dreamy pastel swirls, or the timeless elegance of pearlescent nails? Comment below with your favorite design, and don’t hesitate to share your spring nail creations. Let’s celebrate creativity together and inspire others with your unique manicure style!
All Image Source Link: Pinterest
This site contains affiliate links. I may earn a small commission, at no extra cost to you.