15 Stunning Orange Spring Nail Ideas to Try This Season
Spring is here, and what better way to celebrate than with fresh, orange-tinted nails?
I’ve tried so many nail designs, and trust me, orange is the color for this season. From playful citrus patterns to chic minimalist shades, I’ve got 15 orange spring nail ideas you’ll love.
Keep reading to find your next favorite look!

Best 15 Orange Spring Nail Ideas 2025
1. Tangerine Ombre
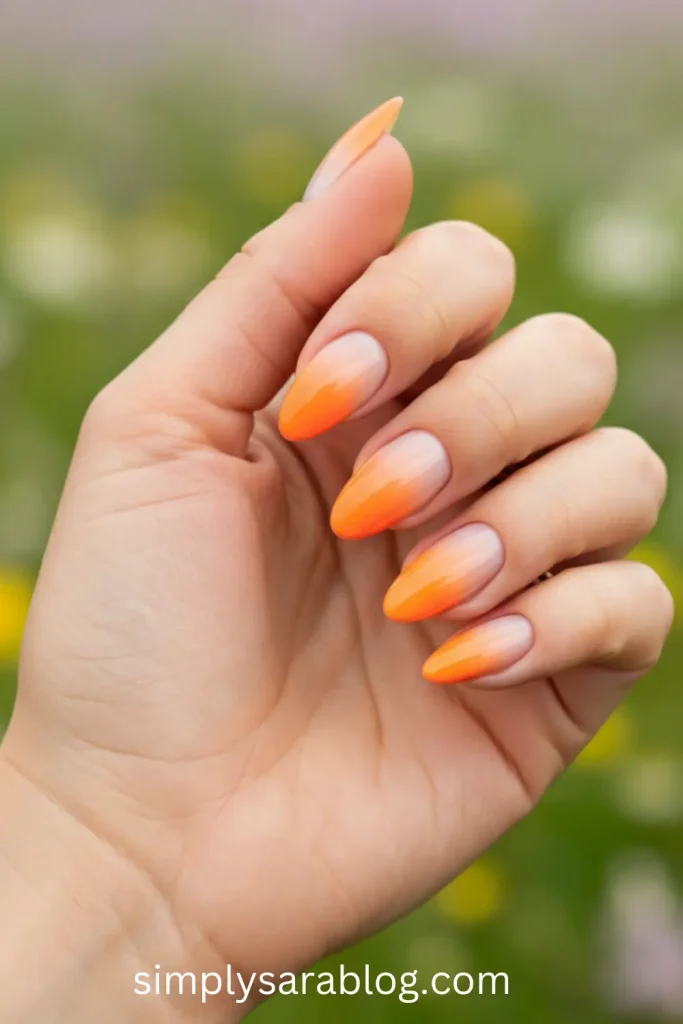
This dreamy, gradient look transitions from a soft pastel orange to a vibrant tangerine tip.
Step-by-Step Instructions:
- Apply a clear base coat.
- Use a sponge to dab pastel orange polish onto the bottom of each nail.
- Gradually add brighter orange polish to the tips.
- Finish with a glossy top coat to blend and shine.
Tools Needed: Clear base coat, two orange polishes (light and bright), makeup sponge, glossy top coat.
Ideal For: Those who love soft, eye-pleasing transitions. Perfect for spring picnics!
2. Citrus Slices
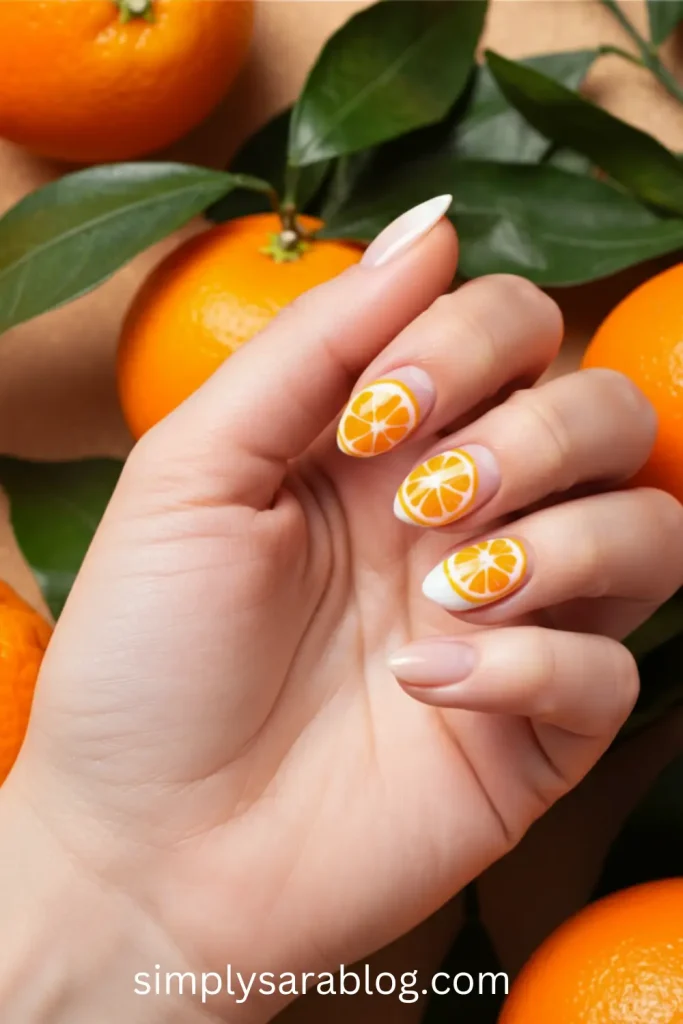
Who doesn’t love some fruity fun? These nails feature tiny orange slices drawn over a milky base.
Step-by-Step Instructions:
- Apply a sheer white polish for a milky base.
- Use a small nail art brush to paint orange circles, then add white lines to mimic slices.
- Top with a glossy coat for a juicy effect.
Tools Needed: Sheer white polish, orange polish, fine nail art brush, glossy top coat.
Ideal For: Bold personalities wanting a playful, spring-ready look!
Read More: 22 Stunning Coffin Spring Nail Ideas You’ll Want to Copy
3. Minimalist Orange Tips
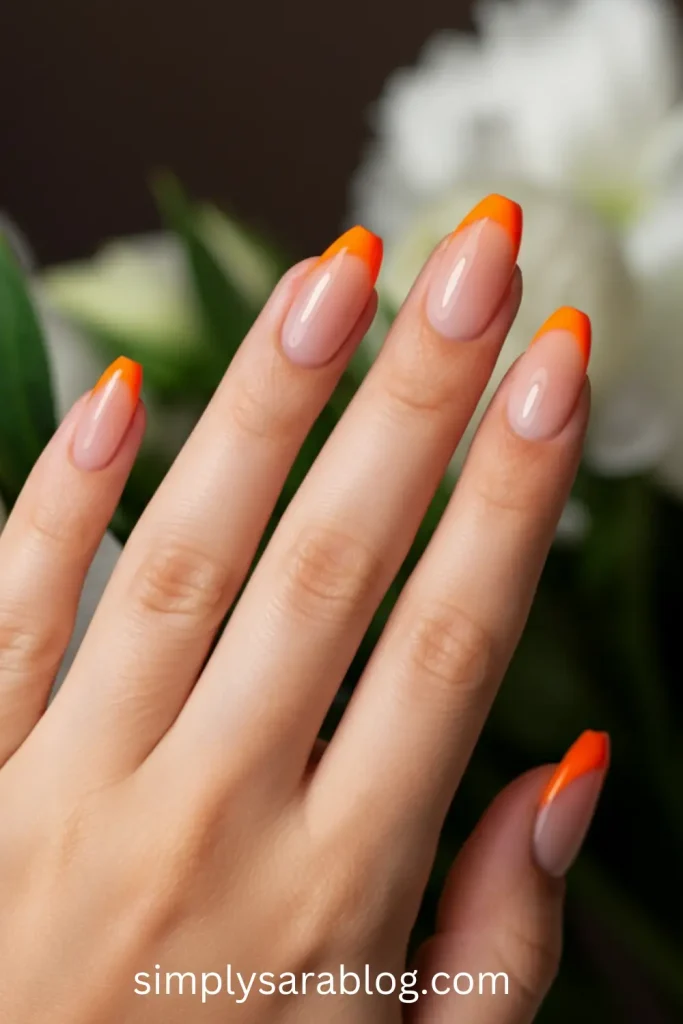
A classy spin on the French manicure with soft orange details.
Step-by-Step Instructions:
- Apply a clear base coat.
- Swipe orange polish across nail tips.
- Use a nail brush to clean the edges, ensuring sharp lines.
- Seal with a clear top coat.
Tools Needed: Clear base coat, orange polish, thin brush for precision, glossy top coat.
Ideal For: Minimalists who love understated elegance in spring.
4. Sunset Vibes
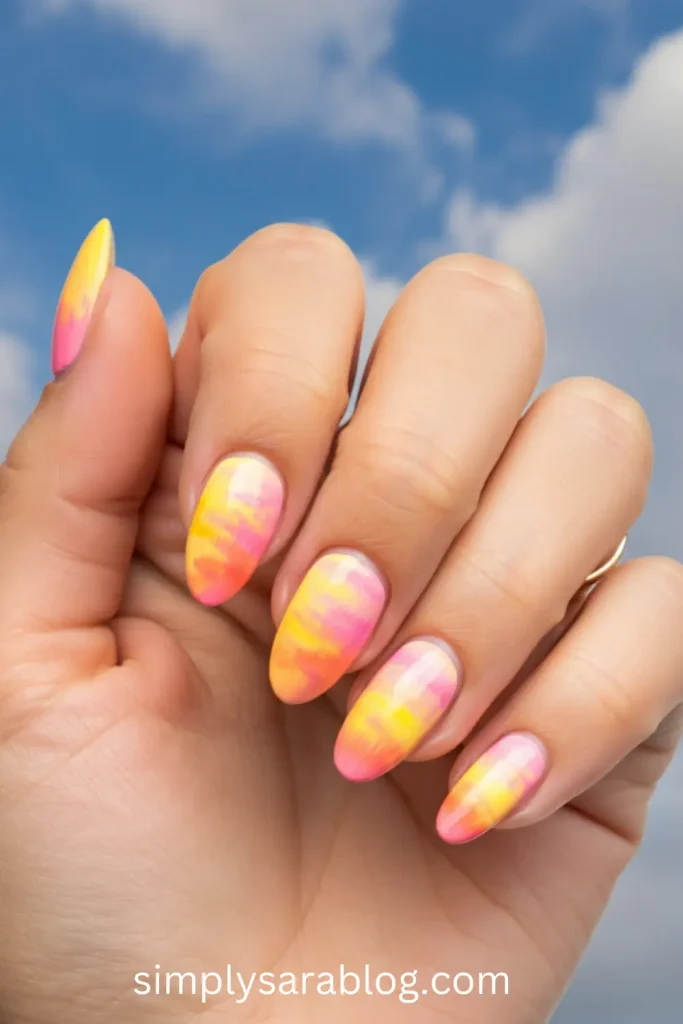
Capture the perfect spring sunset with blendy orange, pink, and yellow tones.
Step-by-Step Instructions:
- Apply a white base coat for vibrancy.
- Use a makeup sponge to layer pink, orange, and yellow polishes.
- Lightly blend for a gradient effect.
- Add a glossy top coat.
Tools Needed: White base, yellow, orange, pink polishes, sponge, glossy top coat.
Ideal For: Dreamers who adore sunsets melting into the horizon.
5. Neon Swirls

Bright neon orange swirls are bold and fun, ideal for spring festivals.
Step-by-Step Instructions:
- Paint your nails with a nude or light peach base.
- Use a nail striper to draw curved neon orange lines across each nail.
- Finish with a clear top coat for a sleek finish.
Tools Needed: Nude polish, neon orange polish, fine nail striper.
Ideal For: Party-goers or anyone who loves eye-catching nail art.
Read More: Top 18 Spring Acrylic Nail Ideas to Freshen Up Your Look
6. Peach Blossom Accents

These nails are soft, breezy, and inspired by blooming peach blossoms.
Step-by-Step Instructions:
- Apply pastel orange polish to your nails.
- Use a nail dotting tool to add peach-colored dots and tiny white petals.
- Add green leaves for detail.
- Seal with a matte top coat.
Tools Needed: Pastel orange polish, white polish, dotting tool.
Ideal For: Nature-lovers who find beauty in spring blooms.
7. Orange with Gold Foil

Add a touch of luxury with metallic gold foil on a deep orange base.
Step-by-Step Instructions:
- Apply a rich orange polish as the base.
- Gently press small pieces of gold foil onto partially wet nails.
- Seal with a clear top coat for gloss and durability.
Tools Needed: Orange polish, gold foil, clear top coat.
Ideal For: Glamorous occasions or anyone who loves to sparkle.
8. Abstract Tangerine Strokes

This artsy design highlights brushstroke-style patterns in orange.
Step-by-Step Instructions:
- Use a white base coat.
- With a nail art brush, add random orange strokes on each nail.
- Keep areas of the white base visible for contrast.
- Protect with a matte top coat.
Tools Needed: White base polish, orange polish, nail art brush.
Ideal For: Creative souls who love modern, edgy designs.
Read More: 27 Fresh Spring Long Nail Designs to Try This Season
9. Tiny Flowers on Orange
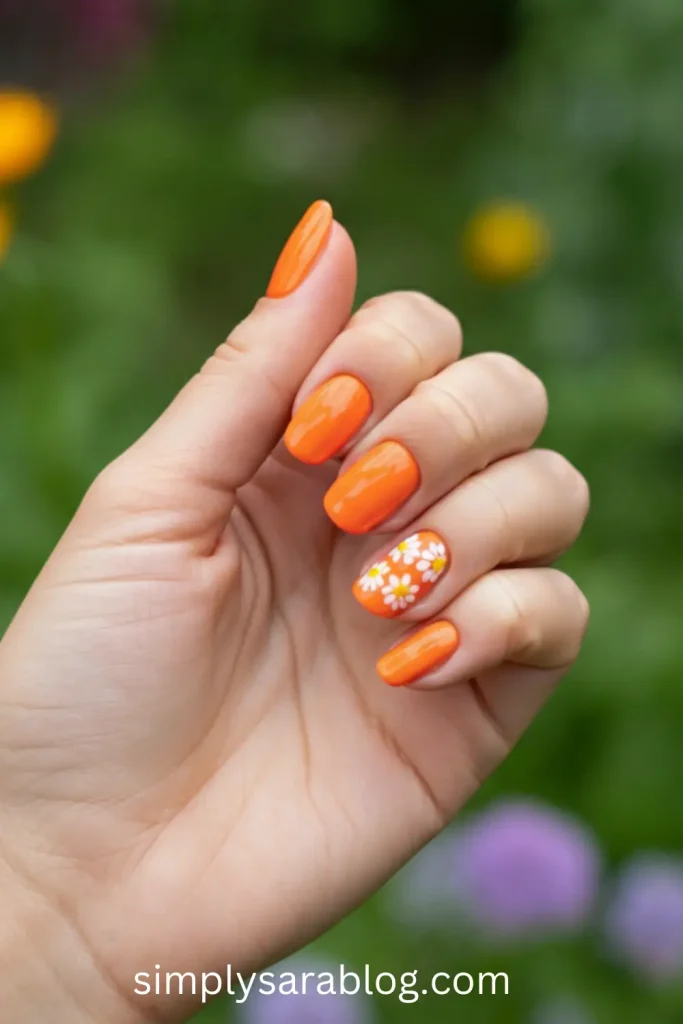
A perfect ode to spring with adorable little flowers over an orange base.
Step-by-Step Instructions:
- Paint nails with bright orange polish.
- Using a dotting tool, create flowers with white centers and yellow petals.
- Seal with a clear top coat for a glossy finish.
Tools Needed: Orange polish, white polish, dotting tool.
Ideal For: Flower lovers celebrating the beauty of spring blooms.
10. Geometric Citrus Art
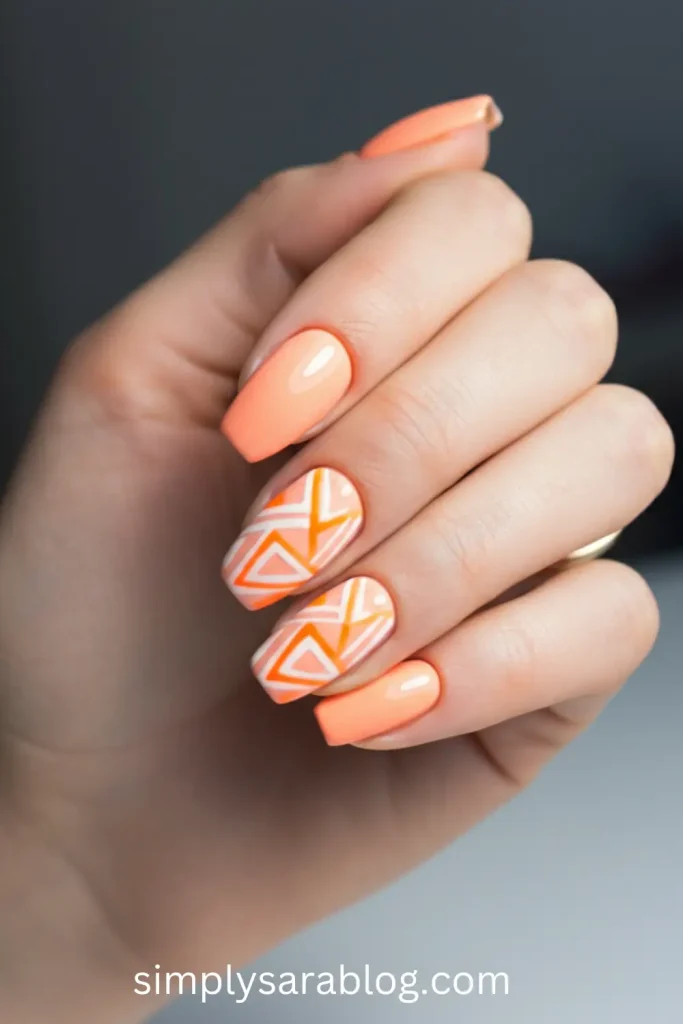
For those who like a modern twist, this design combines orange hues with geometric patterns for a striking look.
Step-by-Step Instructions:
- Paint nails with a pastel orange base.
- Use tape or a nail stencil to create triangles or geometric shapes.
- Fill in designs with a brighter orange polish and white accents.
- Seal everything with a glossy top coat.
Tools Needed: Pastel orange polish, bright orange polish, white polish, nail tape or stencils, top coat.
Ideal For: Modern art lovers who enjoy bold, structured designs.
11. Orange Marble Effect
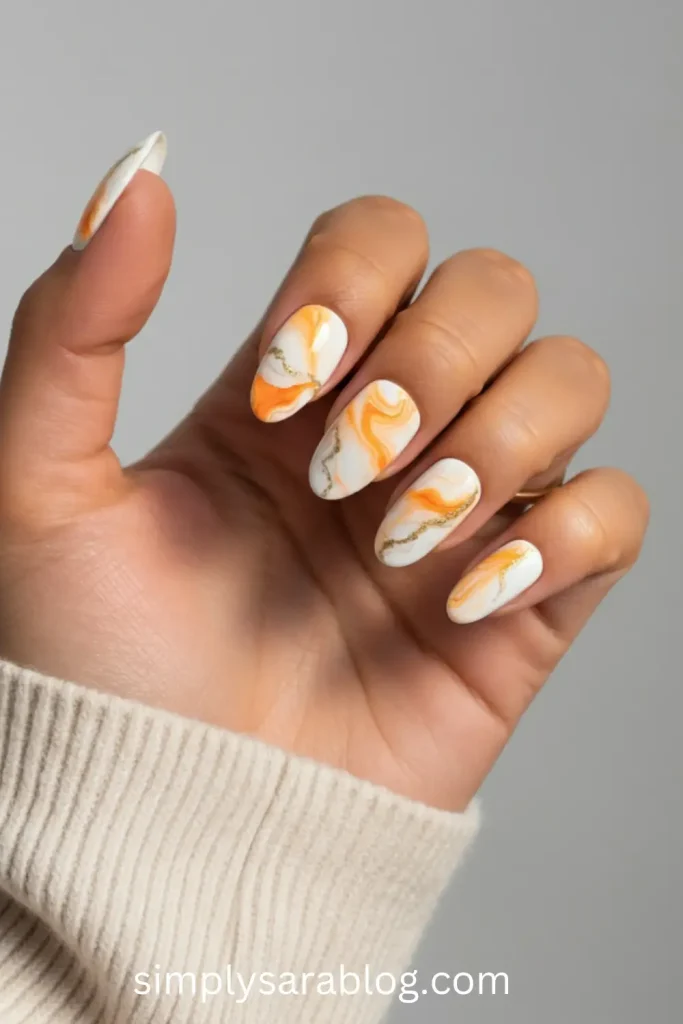
Bring some elegance to your nails with a marble effect that looks complex but is surprisingly easy to achieve.
Step-by-Step Instructions:
- Apply a white polish as your base.
- Thin out some orange polish with clear polish, then use a brush to swirl it onto your nails.
- Add subtle gold streaks for depth.
- Finish with a glossy top coat.
Tools Needed: White polish, orange polish, clear polish, thin brush, optional gold polish.
Ideal For: Classy events or anyone who loves timeless nail art with a twist.
Read More: 59 Gorgeous Spring Nail Art Designs for a Fresh Look
12. Neon French Tips with Glitter
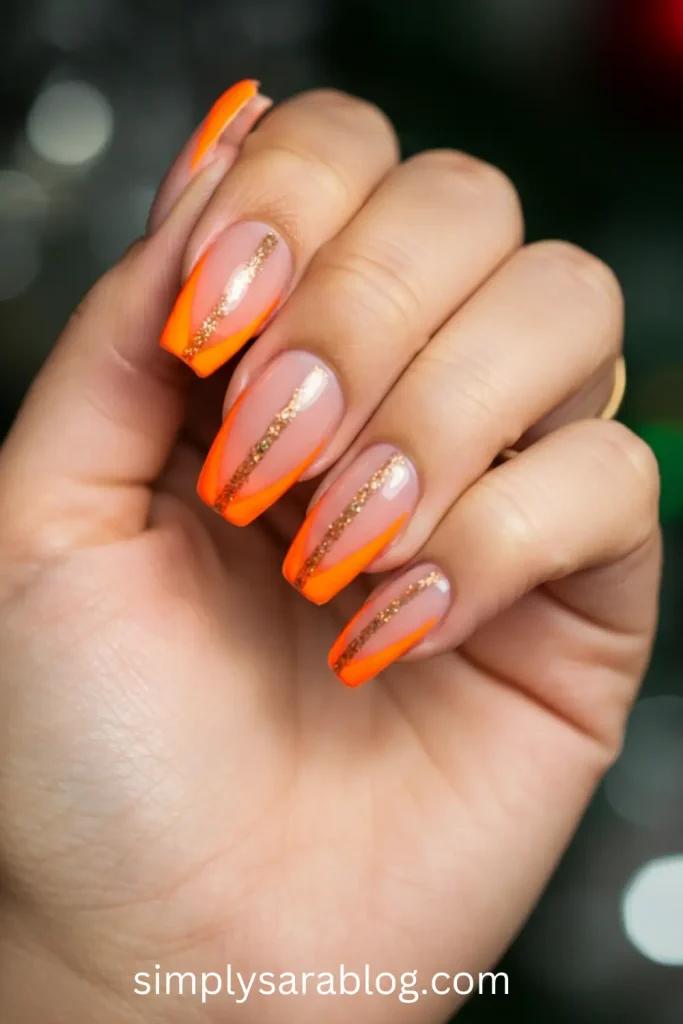
Bright neon orange tips paired with glitter make for a playful and fun design.
Step-by-Step Instructions:
- Apply a clear or nude base coat.
- Paint the tips of each nail with neon orange polish.
- Add a thin stripe of gold glitter polish below the tips for extra sparkle.
- Seal with a top coat for shine.
Tools Needed: Nude base polish, neon orange polish, gold glitter polish, thin brush, top coat.
Ideal For: Outgoing personalities or spring parties under the stars.
13. Orange Daisies Delight

This cheerful design features tiny daisy flowers on a pastel orange backdrop.
Step-by-Step Instructions:
- Paint nails with a soft pastel orange.
- Use a dotting tool to create white daisies with yellow centers.
- Add green leaves for added detail if desired.
- Finish with a matte or glossy top coat.
Tools Needed: Pastel orange polish, white polish, yellow polish, dotting tool, optional green polish.
Ideal For: Daydreamers and flower enthusiasts welcoming spring’s charm.
14. Fire Orange Gradient

This fiery gradient look combines orange and red hues for a bold, striking nail design.
Step-by-Step Instructions:
- Start with an orange-to-red gradient base using a sponge.
- Blend red into orange for a fiery ombre effect.
- Add a bit of glitter to the tips for a dramatic touch.
- Seal your fiery design with a top coat.
Tools Needed: Orange polish, red polish, glitter polish, makeup sponge, top coat.
Ideal For: Bold individuals who love a statement look for spring evenings.
15. Tropical Escape
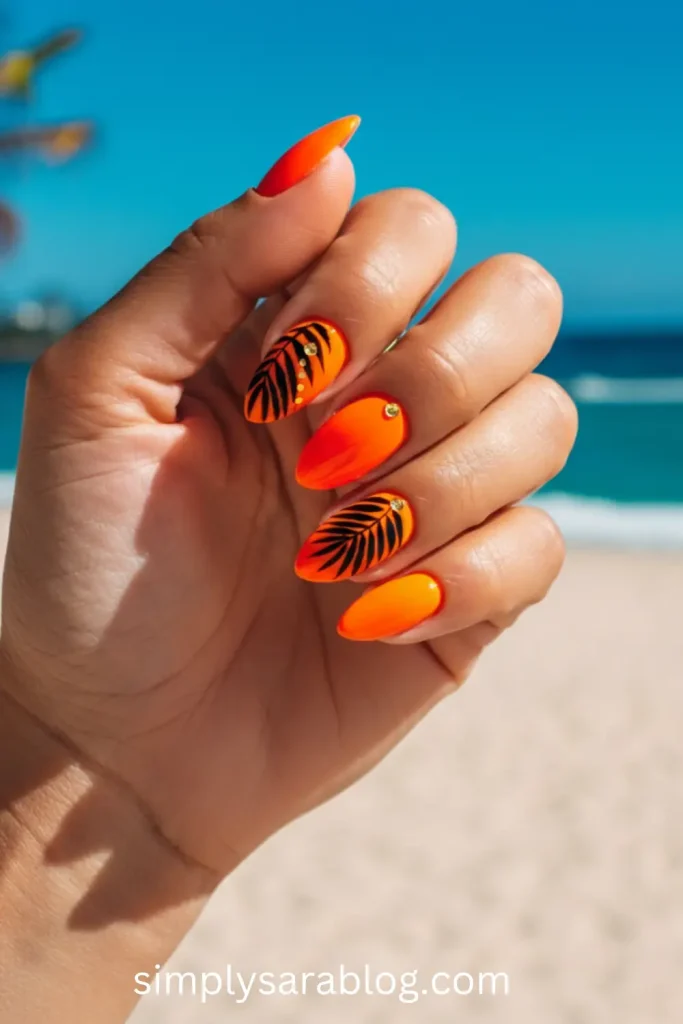
Take your nails on a vacation with a tropical design featuring palm leaves and orange accents.
Step-by-Step Instructions:
- Apply a rich orange polish as your base.
- Use a fine nail art brush to paint small black or green palm leaves on each nail.
- Add tiny gold dots for a sunny vibe.
- Top it all off with a glossy finish.
Tools Needed: Orange polish, black or green polish, fine nail art brush, gold polish, top coat.
Ideal For: Beach lovers dreaming of tropical adventures this spring.
Read More: 25 Short Spring Nail Ideas Perfect for 2025
Choosing Tips for Orange Spring Nail Designs
- Consider Your Style: Are you bold or subtle? Choose designs that match your vibe, like neon swirls for fun or minimalist tips for elegance.
- Match Your Outfits: Think about the colors in your spring wardrobe and pick designs that complement them.
- Seasonal Feel: Lean into spring with designs featuring florals, citrus, or sunset-inspired blends.
- Occasion Matters: Minimalistic styles work for casual days, while glittery or luxurious designs are great for events.
- Skill Level: If you’re a beginner, go for simple designs like ombre or tips. Advanced artists can try geometric or abstract patterns.
FAQ Section
What’s the easiest orange spring nail design for beginners?
Minimalistic orange tips or ombre styles are perfect for beginners. They don’t require intricate tools and are quick to create.
How do I make my nail polish last longer?
Always start with a good base coat, seal with a reliable top coat, and keep your nails dry for at least an hour after painting.
Can I create these designs using gel polish?
Yes, most of these designs can be done with gel polish for a longer-lasting, glossy finish. Just ensure you have a UV lamp!
What shade of orange works for fair skin?
Pastel and peachy orange tones look lovely on fair skin, offering a gentle, flattering contrast.
Are these designs suitable for short nails?
Absolutely! Designs like minimalist tips, tiny flowers, or geometric patterns look fantastic on short nails.
What’s Your Favorite?
I’d love to know—what’s your favorite from these orange spring nails? Are you into the fun citrus vibes, dreamy gradients, or something luxe like gold foil accents? Drop a comment or share your nail art pictures! Let’s inspire each other this spring.
All Image Source Link: Pinterest
This site contains affiliate links. I may earn a small commission, at no extra cost to you.